Creating die cut folders is an excellent way to add a professional and unique touch to your presentations, marketing materials, and office organization. This guide will walk you through the essential steps to create custom die cut folders that stand out. By following these steps, you’ll be able to produce high-quality custom printed die cut folders and benefit from the various advantages they offer.
Understanding Die Cut Folders
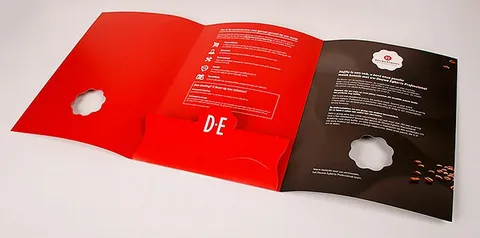
Die cut folders are special types of folders created using a die-cutting process, which involves cutting shapes or designs into the paper or cardstock. This process allows for intricate and custom designs, making the folders not only functional but also visually appealing. They are perfect for businesses looking to make a lasting impression with their presentation materials.
Benefits of Custom Die Cut Folders
Custom die cut folders offer several benefits:
- Unique Design: The ability to create unique shapes and designs sets your folders apart from standard ones.
- Professional Appearance: High-quality custom printed die cut folders convey professionalism and attention to detail.
- Branding Opportunities: Customization allows you to incorporate your brand’s logo, colors, and other design elements, enhancing brand recognition.
- Durability: High-quality materials used in custom die cut folders ensure durability and longevity.
Essential Steps to Create Custom Die Cut Folders
Step 1: Define Your Purpose
Before you start designing your custom die cut folders, it’s crucial to define their purpose. Are they for marketing presentations, client proposals, or internal office use? Understanding the purpose will help guide your design choices and ensure the folders meet your needs.
Step 2: Choose the Right Material
Selecting the right material is essential for the durability and appearance of your die cut folders. Common materials include cardstock, paperboard, and plastic. Cardstock is popular for its sturdiness and ability to hold intricate cuts without compromising structure. Ensure the material you choose aligns with the intended use and conveys the right impression to your audience.
Step 3: Design Your Die Cut Folder
Designing your custom die cut folders involves several key elements:
Shape and Size
Decide on the shape and size of your folders. The shape should complement the purpose of the folder and the content it will hold. Standard sizes include letter size (9” x 12”), legal size (9.5” x 14.5”), and custom dimensions based on your specific needs.
Design Elements
Incorporate design elements such as logos, brand colors, and graphics. Ensure these elements are consistent with your brand identity and create a cohesive look. Use vector graphics for sharp and scalable designs.
Cutting Patterns
Plan the die-cut patterns carefully. Consider adding windows, slits, or other shapes that enhance functionality and visual appeal. Ensure that the cutting patterns do not compromise the folder’s structural integrity.
Step 4: Select Printing Options
Custom printed die cut folders offer various printing options to enhance their appearance:
Offset Printing
Offset printing provides high-quality, consistent results and is ideal for large quantities. It offers a wide range of color options and precise detailing.
Digital Printing
Digital printing is suitable for smaller quantities and allows for quicker turnaround times. It offers flexibility in design changes and customization.
Finishing Options
Consider finishing options such as embossing, debossing, foil stamping, and UV coating to add a premium touch to your folders. These finishes can enhance the tactile and visual appeal, making your folders more memorable.
Step 5: Working with a Professional Printer
Collaborating with a professional printer is crucial to ensure the quality of your custom die cut folders. Choose a printer with experience in die-cutting and a portfolio of successful projects. Provide them with detailed specifications, including design files, material preferences, and finishing options. Clear communication with the printer will help achieve the desired outcome.
Step 6: Reviewing and Proofing
Before finalizing the production of your die cut folders, review and proof the design thoroughly. Check for any design inconsistencies, spelling errors, and alignment issues. Request a physical proof if possible to ensure that the final product matches your expectations.
Step 7: Placing Your Order
Once you are satisfied with the design and proof, place your order with the printer. Consider ordering die cut folders wholesale to benefit from cost savings on larger quantities. Wholesale orders are ideal for businesses that require a consistent supply of folders for various purposes.
Step 8: Storage and Distribution
After receiving your custom die cut folders, store them in a cool, dry place to maintain their quality. Distribute them strategically, whether it’s for marketing purposes, client meetings, or internal use. Ensure that they are presented in a way that reflects your brand’s professionalism and attention to detail.
Tips for Effective Custom Die Cut Folders
- Consistency is Key: Maintain consistency in design elements such as colors, logos, and fonts to reinforce your brand identity.
- Functional Design: Ensure that the die-cut patterns enhance the functionality of the folders. Consider features like business card slots, CD holders, and brochure pockets.
- Quality Over Quantity: Prioritize quality materials and printing techniques over large quantities. High-quality folders leave a better impression and last longer.
- Sustainable Choices: Opt for eco-friendly materials and printing options to align with sustainable practices and appeal to environmentally-conscious clients.
Trends in Die Cut Folders for 2024-25
As we move into 2024-25, several trends are emerging in the world of die cut folders:
Eco-Friendly Materials
With increasing awareness of environmental issues, businesses are opting for sustainable materials. Recycled cardstock, biodegradable plastics, and soy-based inks are gaining popularity.
Minimalist Designs
Simplicity and elegance are trending in design. Clean lines, subtle colors, and minimalist graphics create a sophisticated and professional look.
Interactive Elements
Adding interactive elements like QR codes, augmented reality markers, and pop-up features can make your folders more engaging and memorable.
Personalization
Personalized die cut folders tailored to individual clients or projects are becoming popular. Customization options include adding names, specific content, and unique design elements.
Conclusion
Creating custom die cut folders is a smart way to enhance your brand’s presentation materials and make a lasting impression. By following the steps outlined in this guide, you can design and produce high-quality custom printed die cut folders that meet your specific needs. Whether you are looking for die cut folders wholesale or small quantities for special projects, the right design and printing choices will ensure your folders stand out and serve their purpose effectively. Embrace the latest trends and innovations in die cut folder design to stay ahead in 2024-25.
Read more news on bizbuildboom.com