The global silk screen printing services market was valued at $2.5 billion in 2023 and is projected to reach $4.3 billion by 2032, growing at a compound annual growth rate (CAGR) of 6.0% during this period.
This growth highlights the rising demand for customized printing solutions across industries, making silk screen printing a profitable investment.
Learning how to build a silk screen printing machine can be a game changer. By creating a tailored solution, you can reduce costs and increase efficiency.
In this guide, we’ll show you the essential steps for building your own silk screen printing machine to capitalize on this growing market.
Introduction to Building a Silk Screen Printing Machine
What Is Silk Screen Printing?
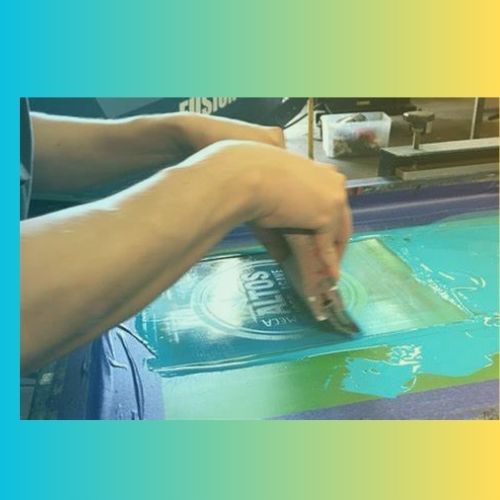
Silk screen printing, also known as serigraphy, is a versatile printing technique used to transfer designs onto surfaces like fabric, paper, and wood. The process involves creating a stencil or screen and using it to apply layers of ink onto the desired surface. This method is prized for its ability to produce vibrant, long-lasting prints, making it a top choice for custom apparel, posters, and signage.
If you’re curious about how to build a silk screen printing machine, understanding the fundamentals of silk screen printing can provide the foundation for creating a machine that suits your specific needs.
Benefits of Building Your Own Machine
Building your own silk screen printing machine comes with numerous advantages, offering cost savings, customization options, and a deeper understanding of the printing process.
Cost Savings: Constructing your own machine can save you considerable amounts compared to purchasing commercial equipment. This can make silk screen printing more accessible to those just starting out or those looking to expand their operations.
Customization: When learning how to build a silk screen printing machine, you gain the flexibility to design it around your specific needs. Whether you require a certain frame size or unique features, building your own machine gives you full control over its capabilities, ensuring it fits perfectly with your projects.
Hands-On Learning: Building a silk screen printing machine provides valuable hands-on experience. By constructing the machine yourself, you not only gain a practical understanding of the process but also learn how to troubleshoot and maintain it efficiently. This knowledge ensures smoother operations and fewer problems down the line.
By embarking on the journey of how to build a silk screen printing machine, you not only get to enjoy the financial and operational benefits but also immerse yourself in the creative and technical aspects of silk screen printing.
Essential Components of a Silk Screen Printing Machine
Building a silk screen printing machine involves selecting the right components to ensure quality prints and efficiency. By understanding how to build a silk screen printing machine, you can create a setup tailored to your specific needs.
Frame and Screen
- Materials and Dimensions: Aluminum frames are durable and warp-resistant, ideal for precise printing. Frame sizes typically range from 16″x20″ to 20″x24″ for most projects.
- Mesh Count: The mesh count affects the detail of your prints. A higher count (200-305 threads per inch) is for fine details, while lower counts (110-160) are better for bold designs.
Printing Platen
The platen provides a stable surface for your workpiece. When learning how to build a silk screen printing machine, ensure the platen is level and securely attached to prevent misalignment. MDF and plywood are commonly used materials.
Hinge Clamps
Hinge clamps secure your screen and allow easy lifting after printing. They must be durable and adjustable to align with your frame size and project needs, ensuring accurate prints.
Squeegee
The squeegee pushes ink through the mesh onto the surface. Made from high-quality rubber or polyurethane, it should be between 12″-18″ in length and medium hardness (70-75 durometer) for consistent ink application.
Understanding these components is essential when figuring out how to build a silk screen printing machine. Each part plays a critical role in producing high-quality prints efficiently.
Overview of key components required to build a functional and efficient silk screen printing machine.
| Component | Details |
| Frame and Screen | Materials like aluminum and mesh count for detail precision. Typically ranges from 16″x20″ to 20″x24″. |
| Printing Platen | Stable surface made from MDF or plywood for accurate alignment. |
| Hinge Clamps | Secures the screen and allows easy lifting after printing for cleaning or adjustments. |
| Squeegee | Made from rubber or polyurethane, it pushes ink through the mesh. Typically 12″-18″ long. |
Step-by-Step Guide to Building Your Silk Screen Printing Machine
Creating your silk screen printing machine is a great way to save costs and gain a personalized printing solution. Below is a step-by-step guide on how to build a silk screen printing machine that fits your needs and maximizes efficiency.
Gathering Materials and Tools
To build your silk screen printing machine, you will need the following materials and tools:
- Frame and Screen: A sturdy wooden or metal frame with a polyester mesh screen, typically 110 mesh for general printing.
- Printing Platen: A flat surface such as wood or acrylic to hold the material you will print on.
- Hinge Clamps: Essential for attaching the screen to the frame and enabling pivoting.
- Squeegee: A rubber blade used to push ink through the screen.
- Screen Printing Ink: Special inks that are designed for the materials you are printing on.
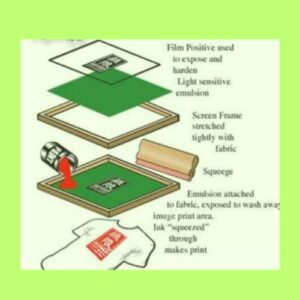
- Photo Emulsion and Sensitizer: Used to create stencils on the mesh screen.
- Light Source: A 250-watt bulb to expose the screen during the stencil-making process.
- Miscellaneous Supplies: Masking tape, gloves, and cleaning supplies.
Constructing the Frame
- Assemble the Frame: Cut four pieces of wood to your desired dimensions and join them to create a rectangular frame.
- Attach the Mesh: Stretch the polyester mesh tightly over the frame and secure it with staples or a staple gun. The mesh should be taut to prevent wrinkles and maintain printing precision.
Attaching the Screen
- Install Hinge Clamps: Attach hinge clamps to the top of the frame. These will allow you to move the screen easily for printing and cleaning.
- Mount the Screen: Place the screen onto the hinge clamps and ensure it pivots freely for ease of use.
Installing the Printing Platen
- Prepare the Platen: Cut a piece of wood or acrylic that fits the substrate (shirt, paper, etc.) you will print on.
- Attach to the Base: Secure the platen to a sturdy base, ensuring it is level and stable for accurate printing alignment.
Setting Up Hinge Clamps
- Position Clamps: Attach the hinge clamps to the frame where the screen will rest.
- Adjust for Alignment: Ensure the screen aligns properly with the platen for precise prints every time.
Preparing the Squeegee
- Assemble the Squeegee: Attach a rubber blade to a wooden or metal handle, ensuring it fits comfortably in your hand.
- Test for Flexibility: Test the squeegee for the proper amount of flexibility to ensure smooth ink transfer.
By following these instructions on how to build a silk screen printing machine, you can create a custom printing solution tailored to your specific needs, increasing efficiency and reducing overall costs.
A detailed breakdown of the steps and materials needed for constructing your silk screen printing machine.
| Step | Description |
| Gathering Materials and Tools | Essential tools: Frame, mesh screen, squeegee, photo emulsion, and light source. Materials include wood, acrylic, and specialized inks. |
| Constructing the Frame | Cut four pieces of wood and join them to form a frame, stretching polyester mesh tightly for precision printing. |
| Attaching the Screen | Install hinge clamps to allow easy screen movement and ensure proper alignment. Mount the screen for pivoting use. |
| Installing the Printing Platen | Attach a flat platen made of wood or acrylic, ensuring it is level and securely attached for printing alignment. |
Pros and Cons of Building Your Silk Screen Printing Machine
Key Benefits and Drawbacks of Building Your Own Silk Screen Printing Machine
Pros:
- Cost Savings: Cheaper than buying commercial machines.
- Customization: Tailor the machine to your specific needs.
- Hands-On Learning: Gain valuable skills in building and maintenance.
- Increased Efficiency: Custom designs can streamline workflows.
Cons:
- Time-Consuming: Requires significant time and effort.
- Initial Costs: Materials can be expensive at first.
- Complexity: Requires a solid understanding of machine components.
- Maintenance: You’re responsible for upkeep and repairs.
screen printing machine
Tips for Effective Silk Screen Printing
Mastering silk screen printing requires careful attention to materials and techniques. Whether you’re learning how to build a silk screen printing machine or refining your skills, these tips will help improve your results.
Choosing the Right Ink and Substrate
Selecting compatible inks and substrates is key to high-quality prints. Water-based inks work well with natural fabrics, while plastisol inks are ideal for synthetics. When learning how to build a silk screen printing machine, choosing the right materials will ensure consistency and long-term reliability.
Proper Screen Exposure Techniques
Correct screen exposure is crucial for clear prints. Ensure even emulsion application and proper drying before exposure. Use a consistent light source and follow recommended exposure times. If you’re wondering how to build a silk screen printing machine, adding adjustable exposure controls can help you fine-tune this process.
Troubleshooting Common Issues
Address common printing problems early for the best results:
- Ink Smudging: Ensure full ink curing to prevent smudging. Integrating a reliable curing system when building a machine can help resolve this.
- Registration Misalignment: Use registration marks for accurate alignment. A machine with precise adjustments can minimize misalignment issues.
- Mesh Blockage: Regularly clean screens to avoid blockages. Designing your machine for easy screen cleaning can simplify this process.
By following these tips and understanding
you can achieve better, more consistent prints.
Helpful tips to optimize your silk screen printing results, including material selection, exposure techniques, and troubleshooting advice.
| Tip | Action |
| Choosing the Right Ink and Substrate | Ensure compatibility between inks and substrates for consistent prints. Water-based inks for natural fabrics; plastisol for synthetics. |
| Proper Screen Exposure Techniques | Use a consistent light source and control exposure times for clear prints. Consider adjustable exposure controls. |
| Troubleshooting Common Issues | Address problems like ink smudging, misalignment, and mesh blockage to maintain quality. Regular screen cleaning and using registration marks can help. |
Advanced Enhancements for Your Printing Machine
Enhancing your printing machine is a great way to increase production efficiency and expand the creative possibilities of your prints. In this section, we’ll dive into two essential upgrades: adding multiple color stations and automating the printing process. Understanding how to build a silk screen printing machine with these enhancements will help you unlock new capabilities and improve your overall output.

screen printing machine
Adding Multiple Color Stations
Incorporating additional screens into your setup is crucial for producing multi-color designs. Knowing how to build a silk screen printing machine with multiple color stations opens up opportunities for more intricate, vibrant prints. Here’s how you can get started:
- Assess Your Current Setup: Determine how many screens your machine can accommodate. A 4-color, 1-station machine prints one color at a time, but you can create more dynamic designs by adding multiple stations.
- Upgrade the Platen: Ensure your platen supports multiple screens. You might need to add extra arms or adjust the size to accommodate additional stations.
- Implement Registration Systems: Registration is key when working with multiple colors. Using registration marks and precise adjustments ensures that colors align perfectly, avoiding blurry or misaligned prints.
- Monitor Ink Application: When printing in multiple colors, ink consistency and curing times are critical. Make sure your inks remain at the correct viscosity to prevent issues during the printing process.
By mastering how to build a silk screen printing machine with multiple color stations, you can offer clients stunning multi-color prints and expand your service range.
Automating the Printing Process
Automation can dramatically improve the efficiency of your silk screen printing machine. From reducing manual labor to maintaining print consistency, automating certain processes will allow you to keep up with high-demand projects. Here’s how you can begin automating your machine:
- Automate Loading and Unloading: Consider implementing automated loading systems to insert substrates and unloading systems to remove finished prints, reducing handling time and minimizing human error.
- Automated Ink Application: Install automated squeegee systems to ensure an even application of ink, reducing variations in print quality.
- Curing Automation: Automated curing systems can adjust the temperature and curing speed based on your specific ink type and material, ensuring optimal results every time.
- Implement Quality Control: Sensors or cameras can be used to monitor print quality in real time, allowing you to adjust immediately and reduce waste.
Understanding how to build a silk screen printing machine with automated processes will save you time, reduce labor costs, and improve consistency across your prints.
By integrating multiple color stations and automation into your printing machine, you will unlock higher efficiency, better quality prints, and increased customer satisfaction. These upgrades will ensure your machine is a powerful asset for your business.
Key enhancements for improving the capabilities of your silk screen printing machine, including multi-color stations and automation techniques.
| Enhancement | Details |
| Adding Multiple Color Stations | Upgrade your frame to accommodate multiple screens. Implement a registration system to align colors perfectly. Ensure ink consistency for vibrant prints. |
| Automating the Printing Process | Automate loading/unloading, ink application, and curing. Implement quality control sensors to maintain high standards and reduce waste. |
Frequently Asked Questions (FAQs) on How to Build a Silk Screen Printing Machine
1. What materials are essential for building a silk screen printing machine?
Frame, mesh screen, hinge clamps, squeegee, printing platen, and inks.
2. How do I choose the right mesh count for my screen?
Higher mesh counts (200-305 TPI) for details, lower counts (110-160 TPI) for bold designs.
3. Can I build a multi-color silk screen printing machine?
Yes, by adding color stations and using registration systems.
4. What are the benefits of building my silk screen printing machine?
Cost savings, customization, and hands-on learning.
5. Are there any challenges in building a silk screen printing machine?
Time, effort, material costs, and understanding components.
6. How can I automate the printing process?
Use automated loading, squeegee, and curing systems.
7. Where can I find detailed plans for building a silk screen printing machine?
DIY websites and screen printing forums.
8. What safety precautions should I take when building and operating the machine?
Wear protective gear and follow safety guidelines for equipment and chemicals.
Wrapping Up
Building your own silk screen printing machine is a rewarding investment that offers cost savings, customization, and a deeper understanding of the printing process. By learning how to build a silk screen printing machine, you can create high-quality prints tailored to your specific needs.
Mastering how to build a silk screen printing machine will open doors to new opportunities, enhance efficiency, and set you apart in a growing market. The skills gained from this project will make it a valuable asset for any printing enthusiast or entrepreneur.